
Table of Contents
- What You'll Need Before You Start Trimming
- Brisket Point vs Flat Preparation: How Each Cut Changes Your Trim
- Step 1: Remove the Fat Cap and Set Your Brisket Fat Cap Thickness for Competition
- Step 2: Trim the Underside and Remove the Deckle
- Step 3: How to Square a Brisket for Uniform Slices
- Step 4: Shape for the Turn-In Box and Slice Thickness
- Common Trimming Mistakes and How to Fix Them
- Frequently Asked Questions
Last Updated: September 17, 2026
What You'll Need Before You Start Trimming
Learning how to trim brisket for competition step by step starts with the right setup, and knowing when to trim brisket matters just as much. A clean work area and sharp tools matter more than speed. At Blowin' Smoke Cookers, we've watched plenty of cooks lose points before the meat ever hit the smoker, all because of a dull blade or a rushed trim.
Gather these before you touch the meat:
- A sharp boning knife or scimitar for long, clean cuts
- A cutting board that won't slide under pressure
- Paper towels for gripping the slick fat
- A trim bin for scraps you'll reuse later
- Food-safe gloves
Knife sharpness is not optional.
Brisket Point vs Flat Preparation: How Each Cut Changes Your Trim
The point and the flat need different treatment, and treating them the same is a common mistake.
So your trim plan shifts across the brisket:
- Over the flat: thin, uniform fat cap
- Over the point: slightly thicker, more forgiving cap
- At the seam between them: keep the muscle separation clean
Step 1: Remove the Fat Cap and Set Your Brisket Fat Cap Thickness for Competition
The target brisket fat cap thickness for competition is about 1/4 inch across the flat. That's the number judges reward, and it's the number that protects the meat without turning into a grease sponge.
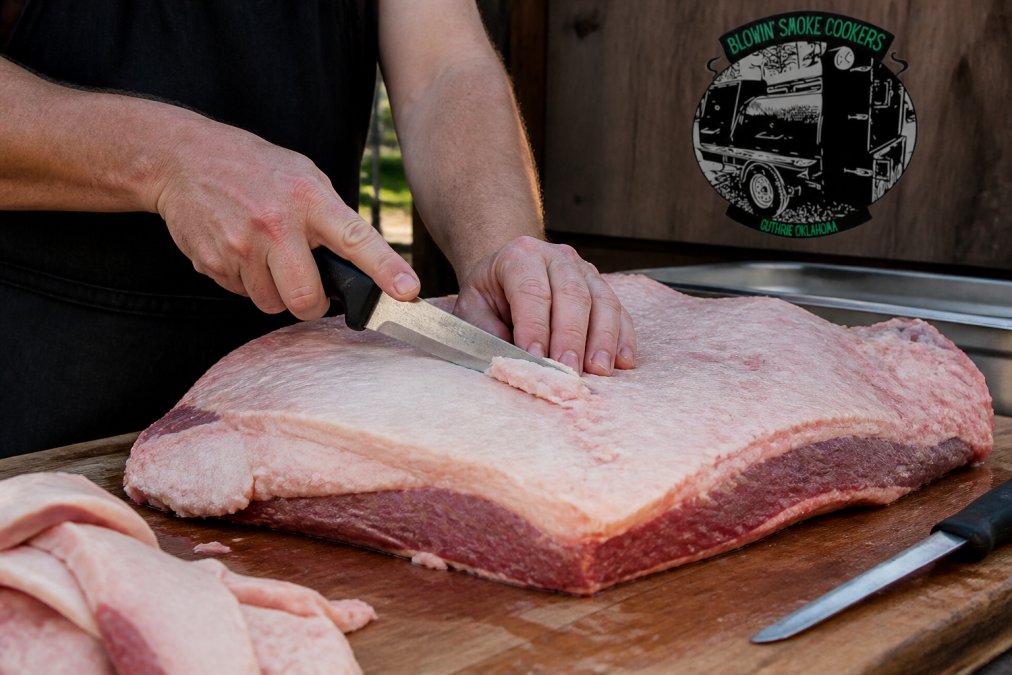
- Aim for 1/4 inch over the flat
- Leave a touch more over the point
- Keep the surface level, not lumpy
Step 2: Trim the Underside and Remove the Deckle
Flip the brisket over and look at the meat side. This is where the deckle lives: a thick band of hard fat and connective tissue running between the flat and the point. It will not render at any realistic cook temperature, and it blocks your slices. Leave it in and you get chewy, gristly bites that tank tenderness scores.
Temperature matters more than technique here
The single biggest variable in a clean deckle removal is meat temperature. A brisket pulled straight from a 38°F refrigerator has fat that is firm and brittle, the knife skates, the seam closes up, and you end up hacking at the muscle. Let the brisket sit at room temperature for 20-30 minutes before this step. You are not looking for warm meat; you are looking for fat that has softened just enough to separate from the muscle without smearing.
Finding the natural seam
The deckle is not something you carve out with force. It sits along a natural separation between the flat and the point, and your job is to follow that gap, not create one.
- Start at the thick end (the point side) where the seam is widest and easiest to read.
- Insert the tip of your boning knife just under the hard fat layer, angled slightly toward the fat, not the meat.
- Use short, controlled strokes to lift the fat away while your non-knife hand pulls the fat layer back.
- Let the blade find the gap. If you are sawing, you have lost the seam, back out and re-enter.
Silver skin: the membrane that costs you tenderness
Once the deckle is out, run your fingers across the exposed meat. Silver skin is the thin, pearlescent membrane that tightens and toughens as it cooks. It is not fat, it will not render, and it will not soften. On a competition turn-in, a strip of silver skin left on the flat reads as a chewy bite.
To remove it:
- Slide your blade flat against the meat, just under the membrane.
- Keep the blade angled slightly upward so you are lifting the silver skin, not digging into muscle.
- Peel it back with your free hand as you go. If it tears, re-enter and continue.
- Do not try to pull it off dry, it will rip and leave patches behind.
What to do with the deckle and trim
This is the step most guides skip entirely, and it is where a competition trim pays you back at home. The deckle and trimmed fat are not waste.
- Render the fat into tallow. Cut the fat into rough chunks, run it through a slow cooker or a low oven (around 225-250°F) for a few hours, and strain. The resulting tallow is what you use to wrap the brisket, baste it mid-cook, or finish burnt ends.
- Grind the lean trimmings. Any clean meat you trimmed off the flat or point, no fat cap, no silver skin, goes into a burger grind or a brisket-and-chuck blend. A common ratio is roughly 70/30 lean-to-fat for burgers.
- Save the scraps for sausage. Brisket trim mixed with pork fat is a classic base for smoked sausage.
Step 3: How to Square a Brisket for Uniform Slices
Knowing how to square a brisket is what separates a clean turn-in box from a messy one. Squaring means trimming the edges so the brisket forms a neat, even rectangle with straight sides.
Work the edges:
- Trim thin, flap-like corners that would burn
- Straighten the sides so slices come off even
- Remove any hanging bits that would char
Step 4: Shape for the Turn-In Box and Slice Thickness
- Square the flat for even slices
- Keep the point intact for burnt ends
- Cut against the grain for tenderness
When you're ready to cook at that level, the SNS Cabinet 60 Wagon Competition Smoker holds 20-30 briskets with three slide-out racks, so a full competition load cooks at once.

Common Trimming Mistakes and How to Fix Them
Most trimming guides tell you what to do. Fewer tell you what it looks like when you got it wrong. Here is a visual troubleshooting pass, what the mistake looks like on the board, what it costs you at the table, and how to correct it.
Over-trimming the flat
What it looks like: The flat is bare in patches, with pink meat showing through where the fat cap used to be. The surface is uneven and the brisket feels thin when you press it.
Under-trimming the fat cap
What it looks like: The cap is pillowy and thick, well over 1/4 inch in places, with a soft, spongy feel. The surface is lumpy rather than level.
Leaving the deckle in
What it looks like: A hard, waxy band of fat running between the flat and the point. It feels firm and slightly gritty under the blade, not soft like the fat cap.
A dull knife
What it looks like: The fat cap is torn rather than sliced. Edges are ragged. You are sawing instead of gliding.
Trimming at the wrong temperature
What it looks like: The fat smears instead of slicing cleanly. The seam between flat and point closes up. The blade skates across the surface.
Food safety while you work
Trimming a packer takes time, and the meat is out of refrigeration the whole while. Keep your board and blade clean, work in batches, and chill anything you are not actively trimming. Trim scraps destined for the grinder or the tallow pot go in a covered container in the fridge, not on the counter.
Frequently Asked Questions
What is the difference between a backyard trim and a competition brisket trim?
A backyard trim leaves more fat and irregular edges because you are cooking for flavor and moisture. A competition trim is precise: you remove hard fat, square the edges, and aim for a uniform shape so every slice looks clean in the turn-in box. Competition cooks also trim the point-to-flat transition to avoid gaps. The goal is presentation and consistency, not just taste.
How much fat should be left on a competition brisket?
Most competition pitmasters leave about 1/4 inch of fat on the flat and slightly more on the point. This thickness renders down during a low-and-slow cook, basting the meat without leaving a greasy layer. If you leave too much, the fat will not fully render and can hurt texture. If you trim too close, the meat risks drying out. Aim for even coverage across the surface.
Why is the point-to-flat transition important in competition trimming?
The point-to-flat transition is where the two muscles meet. If you do not separate them slightly and remove the hard fat between them, the brisket can cook unevenly and slices may fall apart. A clean transition helps both muscles cook at a similar rate and makes it easier to slice uniform pieces for the turn-in box. It also reduces waste when you separate the point later.
Does trimming affect the cooking time of a competition brisket?
Yes, trimming affects cooking time. A brisket with a thick fat cap takes longer because the fat insulates the meat. Trimming to 1/4 inch exposes more meat surface, so heat penetrates faster and the cook can finish sooner. However, over-trimming can cause the meat to cook too quickly and dry out. Consistent trim thickness helps you predict timing on competition day.